Fotophire Editing Toolkit
Your Complete Photo Editing Toolkit
Looking for helpful photoshop effects tutorials to perfect your photos for any purpose? Then you’re looking in the right place! Inside of this article, we’ve outlined how to use photoshop filter effects on the newest version of Photoshop (Photoshop CC 2018.)
Not only that, but we’ve also included a couple of photoshop effects that you can try out for yourself (all of which are FREE and easily downloadable!) We’ll also be introducing you to a photoshop alternative that is much easier to use. Give it a scroll and see if it’s the kind of thing that will interest you!
Photoshop is one of the biggest and most content-rich photo editors out there. It’s a monster of a program, with tons of tools that you can use to edit your product. The only catch here is (outside of the expensive annual subscription price) is that it can be quite complicated to use for people who are just trying things out for the first time. This is especially true for if you’re looking to add effects. Nevertheless! We’ve managed to condense the usual lengthy process by introducing you to “Photoshop Actions.” Learn more down below!
Come to Photoshop's official website to download the free trial version.Your launch screen should look a little like this (refer to the image down below.) Click on the “Open…” text button to get started!

Clicking on the “Open…” text will prompt you to choose an image, so make sure to pick the one you want to edit. For this Photoshop effects tutorial, we’re going to be using the image down below!

If you want to use preset filters, then you’re going to have to import them into Photoshop (scroll down for example presets that you can use!)

Next, you’re going to be transferred to a tab window like this (refer to the image below.) This is where you’re going to be able to choose the presets that you want to import. Follow the following to successfully import your presets:

Next, we’re going to load the presets into the program. In order to do this, you’re going to have to add the “Photoshop Action” into your “Actions” module. This module can be found on the right-hand side of the screen and looks like an upside down triangle.

Next, click on the “=” tab on the upper right-hand corner of the Actions module. Then locate the “Load Actions” option. This will allow you to choose which action you want to load into Photoshop.

As you can see, we successfully imported a list of filters. These can be used to automatically apply actions to your image. To do that, click on the name of the filter, and then the “play” button at the bottom of the module.

As you can see, the filter was automatically applied. No further action from me was needed! Refer to the examples down below to see a list of photoshop filter effects that you can try!

Here’s a couple of photoshop filter effects that you can try! Just follow the above method for importing the following preset actions to apply these automatically! Of course, you can also download photoshop filters directly from the Photoshop store. However, most of those are paid and can be quite costly.
Looking for Retro Photoshop Effects? Then you might want to try this set from Spoongraphics! They offer a couple of paid options as well, but if you go the URL we linked down below, then you can get the 10 free samples they offer! For this sample, we decided to show off their green-toned “Helga” look (refer to the image down below.)
URL: https://blog.spoongraphics.co.uk/freebies/10-free-retro-style-photo-effect-photoshop-actions

Now, if you’re looking for something to give your image that sweet old-timey look, then you might be interested in the “Vintage” photoshop filters from Beckasweird! Just click on the URL to download it directly from their blog! This set comes with 5 free photoshop photo effects.
URL:https://beckasweird.deviantart.com/art/Vintage-Action-5-197731292

This one is a little closer to the previous effect. Using this will make your image look like it’s been washed by time. Just like the yellow-tinted images that your mother loves to cherish! This is downloadable for free through Sakiryildirim’s personal blog.

If you’re looking for something that will provide a big pop of color, then you might want to try out Forfie’s HDR presets. These will divide your image into digestible color blocks that makes for a dramatic photoshop effect look.
URL: https://forfie.deviantart.com/art/HDR-Tools-66904781

We’re bringing things back down for a bit with this portrait actions. Our application of it is a bit poor, but if you want you can test it out on a portrait of yours! It’s particularly effective for providing that worn-down aged look. Which can add a dramatic flair for even your most basic portrait.

Now we’re getting in to the more bizarre-looks. This photoshop filter from Comicidiot, might look strange at first. However, it does serve its own purpose! It colors the car effectively, changing it from a bright red to a bright blue!
URL : http://comicidiot.deviantart.com/art/InfraRed-Photography-Action-122602613

Simple, but still strikingly gorgeous. This black and white photoshop filter from Jean31 tones down the all the colors and allows it to meet at a neutral gray. It’s particularly effective for contrast of gray tones.
URL: http://jean31.deviantart.com/art/Black-And-White-57962641

VHS EFFECT
Now, if what you’re looking for is a smooth VHS effect, then you can try out one of Jonasfan93’s 3-D actions. This is just a sample of the more tone-down looks. The other actions are brighter and will offer a big pop for your images!
URL: http://jonasfan93.deviantart.com/art/ACTION-3D-147755439

If you’re looking to get fun with it, then you might appreciate this unique pencil sketch photoshop effect from Bati1975! This editing shouldn’t take you any more than a couple of minutes!
URL: http://bati1975.deviantart.com/art/Pencil-Draw-Photoshop-Action-93249233

This is not a filter, but an example I want to give about photoshop effects! This one from Panosfx can turn any image into a sticker sample with just a single click! It’ll keep the definition of your image whilst cropping it for you automatically!
URL: http://www.panosfx.com/free-photoshop-actions/stickers-tapes

Now that we’ve fully explored photoshop photo effects, we’re going to introduce you to another photo editor that you can use in place of Adobe Photoshop. This easier-to-use-editor is called the Fotophire Editing Toolkit. It’s a graphics editor that comes in a package of multiple software that you can use to edit, decorate, crop, etc. Here are just a couple of things that you can use it for!
The Fotophire program will open up this little window once it’s been launched. Click on the “Photo Editor” option on the left hand side. It should send you to the next screen in just a couple of seconds!

This is the part where you import the image that you want to add photoshop filters to! Just click on the white “Open…” text on the left hand side of the screen to be brought to the main editor.

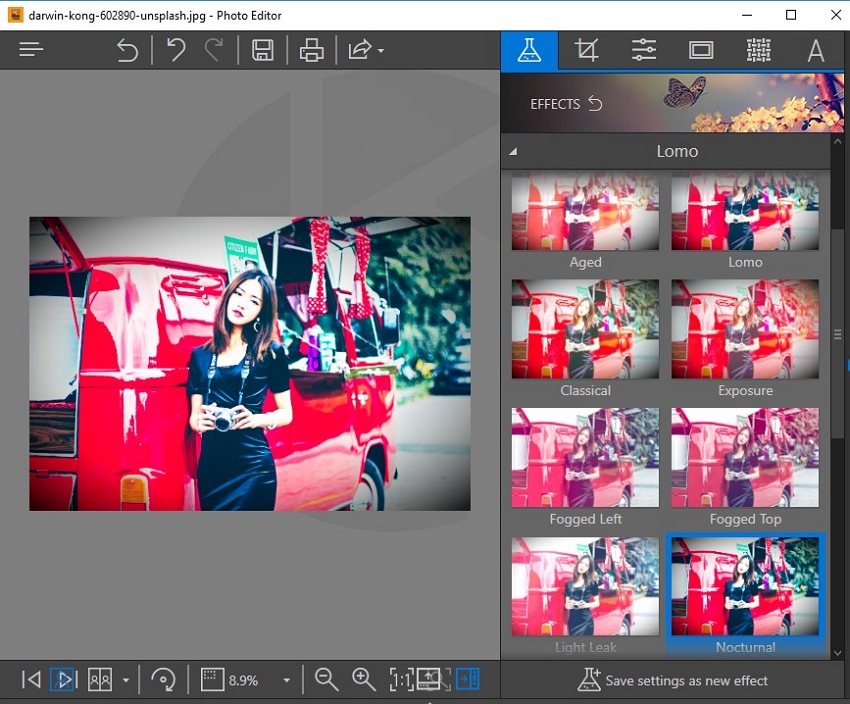
We’re headed straight into the effects for this one! Because, unlike Photoshop, the filters are automatically added for you! Yes, the Fotophire Photo Editor comes with hundreds of different photoshop filters that can color your images. Just click on the beaker-like tab (highlighted blue in the image below) and scroll through the effects!
Lomo: The Lomo effect comes first. As you can see, this varies from tone down to bright (previews on the right-hand side of the screen.)
Black and White: Next, we have the black and white effects! These will vary in contrast and play with the gray tones on the image. For example, this “Deep” filter that we applied shades ups the contrast and provides and alluringly striking image (bringing focus to the darkest part of the photo.)

Vintage: These filters are a personal favorite of mine. I love these for classy vintage styles. The “Exhausted’ filter is my personal favorite. It just gives off the feel of old commercials and movies with pinkish-faded tones.

Photography: If you’re looking for something more modern or artistic, then you might be interested in the Photography effects! These offer a variety of different filters that will are new and exciting, something more familiar to the younger audience of today.

Portrait: The portrait effects offer dramatic effects that can add a certain pizazz to your images! The “Diamond” filter, for example, adds translucent baubles that makes the image look dreamy and soft.

Cinema: We’re going back to the retro-ish feels with the Cinema Effects. These will make your images pop in a way that’s very alluring to the ideas. My personal favorites would be “Matrix” and “Cinematic.” Both of which offer an interesting two-tone contrast.

Environment: If you’re looking for something to match a certain mood (whether it’s the mood of the season, the time of day, etc.) Then you might want to check out Fotophire’s Environment effects. These offer gorgeous color overlays that can change the look of your images drastically.

Color: If you’re looking for more dramatic color overlays, then Fotophire has got your back on that one too! They offer a variety of color-focused effects that will tone your image and offer a dramatic but crisp photograph.

The Photoshop way of adding filters and effects is hard! You not only have to import each filter individually, but you might end up spending a ton of money by paying for said effects in the first place! With the Fotophire Photo Editor, not only are the filters automatically available but you can also see a preview of the filters that you’re interested in! Ultimately, the Fotophire Method is cheaper, easier and much more organized. It’s a no-trouble solution!
