Fotophire Editing Toolkit
Your Complete Photo Editing Toolkit
We’ve all faced instances where we’ve needed to quickly remove a watermark from an image. It may be for an upcoming presentation requiring a few last minute additions to illustrate your point. Maybe you’ve already purchased an image but lost access to the original or maybe you’re working with a design team and need to make sure everything you send has perfect clarity.
This tutorial will show you the quickest and cleanest ways to remove watermarks. Many marketers and designers may have access to Photoshop, but due to the complexity of this powerful manipulation software. If you don’t have Photoshop already it’s a very expensive solution; instead we’ve put together some much quicker and cheaper ways, including tools specifically designed as watermark removers.
Please remember, if you’re using a stock image for commercial purposes it’s a much better idea to purchase the image rights. Using an image without copyright permission can open you up to lawsuits and fines, often entitling the original artist to a share of the profits far beyond the cost of the original image. You don’t want to be the person putting your company at legal risk!

These tools are by far the quickest ways to remove watermarks with minimal hassle. They can erase watermarks without impacting the background of the image by using intelligent analysis to leave the background as it was. Due to the sophistication of these tools, they’re much more skilled at watermark removal than a human hand.

Fotophire from Wondershare tops our list of dedicated tools as it’s the quickest and easiest to use. A built in tutorial will help you get up to speed with this software in no time. The interface does a good job of hiding the complexity behind it, but this is actually one of the most sophisticated watermark removers out there. The intuitive controls are perfect for image editors of all levels, from beginners just starting out to experts looking for a quick way to address this specific problem. In addition to the watermark removal tools this package also offers a full editing suite, including background editing & replacing, photo retouching and over 200 effects which come at no additional price. If you’re using a windows PC this is our number one recommendation.
The removal process is so simple that we can summarise them in four simple steps:
Step 1. Launch Fotophire Photo Eraser and import the chosen photo from your computer library.

Step 2. Mark the object you wish to erase using the fully customisable brush. You can pick the size and shape. Alternatively you can use the intuitive lasso tool that allows for precision selection.

Step 3. Click Erase and the powerful algorithm will remove the unwanted watermark (or any other object you’ve highlighted) without impacting the background. It is that simple!

Step 4.
If needed you can use the variety of tools (e.g. the clone stamp or customisable brush) to touch up the photo however you wish. You can view the full guide here. If this simple, intuitive software isn’t for you, you could also try Inpaint , Movavi or Softobis Photo Stamp Remover.
If, however, you’re using a Mac, there’s a similar, albeit marginally less full, offering. This watermark removal software doesn’t come with the full editing suite that fotophire offers, but it does use innovative and intelligent retouching software to quickly remove the selected object without affecting the background. The software can easily handle the removal of distorted shapes in high contrast images without leaving a trace. You could also try Inpaint for Mac.
While not as sophisticated as the two previous programs, PixCut comes with one distinct advantage--it’s a purely online tool, requiring no software downloads. Instead, you merely upload your image and you’re ready to go. The downside of this is that you’ll constantly need a working internet connection, so it’s not ideal if you like to edit photos on the go. Despite being purely online, this is a powerful tool and as removing watermarks and other images is its only function it’s very simple to use.
Step 1: Go to the official home page of the PixCut website. and click on “Remove Watermark”.

Step 2: To upload an image that you want to remove the watermark.

Step 3: In order to remove a watermark from the image you can choose Select and adjust the Brushstroke Size to draw over the unwanted object.

Step 4: Click on “Remove Objects” and PixCut will remove the unwanted objects. Now, all that’s need is to download the resulting image.

If you already have a photo editing suite like Photoshop or fotophire, then you can always edit out unwanted watermarks manually. One of the easiest ways to do this is to use the clone tool. Depending on the image you’re editing this can be a tricky process, so we’ve included a guide on how to do it like the pros below.
Step 1: Import the photo you’d like to edit.

Step 2: Use the clone stamp on area of the background. For precise edits you can zoom in until you can highlight a smaller group of pixels, but if the image is lower quality or the background is all one colour you won’t need to be so selective – for instance, if the background behind the watermark is plain black, you won’t need to zoom in at all.
Step 3: Use the clone tool on the watermark or object you want to remove. Depending on the resolution and complexity of the background image you may need to use the clone stamp to select a different area of the background to make sure it lines up correctly - if your background is striped vertically you’ll need to adjust the colours.

And finished!
A simple and elegant solution, but one that many designers won’t consider. If the watermark is near one of the sides of the image, it’s much easier to simply crop it out. If you’re posting the image online most websites will automatically stretch the image to the correct size, so this will almost always work with large photos.
If you intend to use your own watermark (and please remember that doing this on a copyright image is illegal and can lead to a hefty fine), then you can simply place your own image over it. This can be done either with software like fotophire or with most online editors. You need only import the image you want to use, resize it and drag it over the previous watermark until it’s entirely covered.
Using Google images, you can search by image or key word to find a related image that’s perfect for your use without having to go to the trouble of editing it. This is ideal if the image is something you’d like to use throughout a presentation as you’ll be able to find similar alternatives that you can use in its place.
You can also search for stock free images that won’t have watermarks. There are hundreds of sites online to do this - Pexels is a good place to start.
After removing watermarks from photos, you're able to make full use of these photos to make a photo slideshow for an enjoyment. Fotophire Slideshow Maker, an easy-to-use yet powerful slideshow maker program, can help you to create your own photo story in 3 simple steps. In this part, we're going to introduce how you can make a photo slideshow with the help of Fotophire Slideshow Maker.

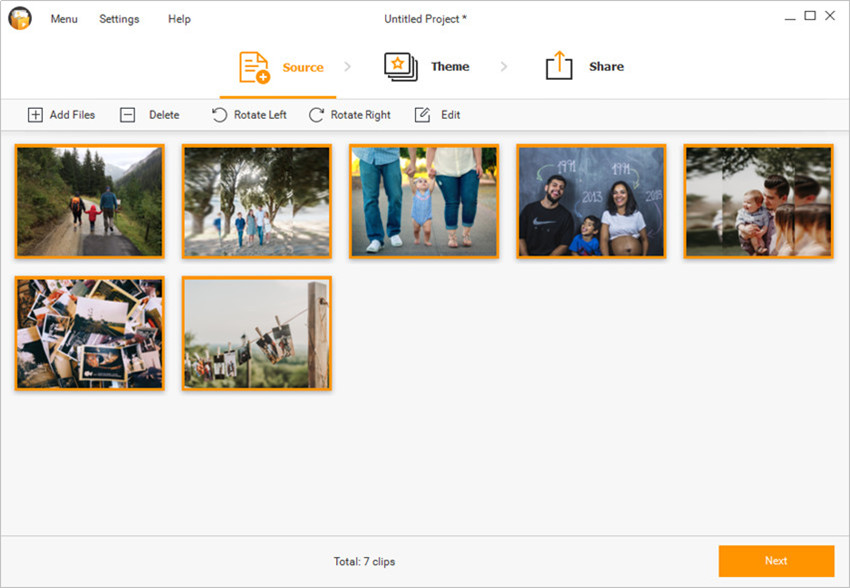
Download and install Fotophire Slideshow Maker on your computer, then start it. Now you can add photos by dragging and dropping them into the program window, or clicking the big + button to add photos, or clicking Add Files > Add Photos or Videos to add your photos. Please note that if you can add photos or videos from different sources in the drop-down menu. After adding photos or videos, you'll see them in the main interface of the program.
Now click Theme at the top or Next button at the lower-right-bottom of the program window, and select a theme for your slideshow. Fotophire Slideshow Maker offers 26 templates for you to choose, and they belong to 6 categories, including Popular, Birthday, Holiday, Family, Memory, and Kids.

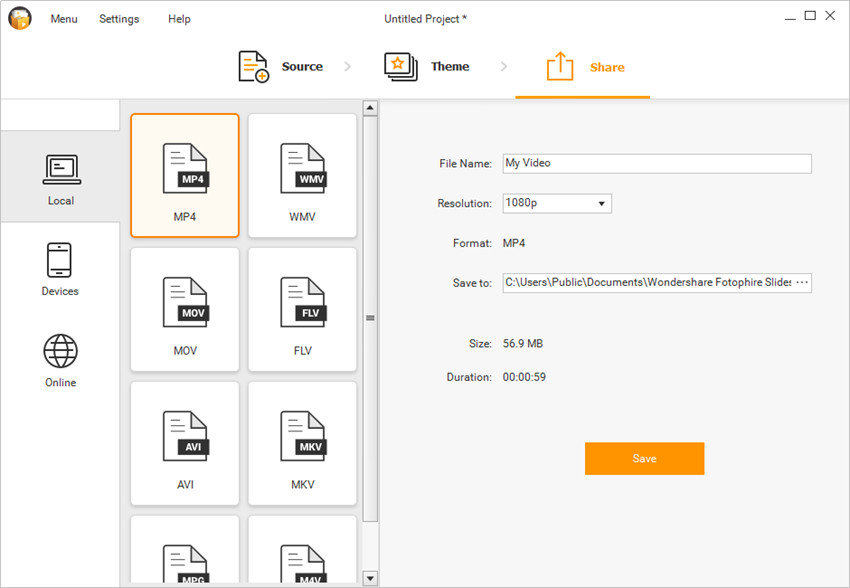
Now click Share at the top or Next button at the lower-right bottom of the main interface to save or share your slideshow video. The program provides you multiple video formats for output, and it also allows you to share the created video to YouTube directly.
That's it! With the help of Fotophire Slideshow Maker, you're able to create a fantastic photo slideshow in easy clicks. If you're interested in this program, don't hesitate to give it try.

