Photoshop App for PC Review
Whether you click the photos with your mobile or you have photos clicked by a professional photographer. If you need to enhance the photos the first software comes in mind that is adobe Photoshop which is the most popular among the worldwide users. Due to the popularity of the software now Adobe has developed mobile versions as well. There are different versions of Photoshop available and we are going to review some popular versions in this article today. Let’s start it.
- Part 1. Photoshop CC Review
- Part 2. Photoshop Express Review
- Part 3. Photoshop Mix Review
- Part 4. Photoshop Fix Review
- Part 5. A Easier Desktop Solution for Photoshop Alternative
Part 1. Photoshop CC Review
Photoshop CC
URL: https://www.adobe.com/in/products/photoshop.html?promoid=PC1PQQ5T&mv=other
Price: 9.99$ Per Month
Photoshop CC is desktop software available for the windows and Mac OS provided by adobe officially to edit the photos on your computer. This program is purely professional photo editor software that comes with all the basic to advanced level photo editing tool to edit the photos. This program still remains the most powerful photo editor without any question but the only drawback is that this is mostly designed for professionals so you can’t use it easily without any tech knowledge.
Key Features
- Most advanced and professional tools for retouching images from scratch.
- Working with layers is a nice option for the professional photographers.
- Multiple brushes available to edit the images according to the selection area.
- It is compatible with the spherical panoramas.
- Content aware and face aware are super options for automatic image enhancement.
How to Use Photoshop CC
Photoshop CC is not only for doing basic editing, it is advanced editing software so you can do all from basic to advanced level editing. Here we will see a basic editing function of the program.
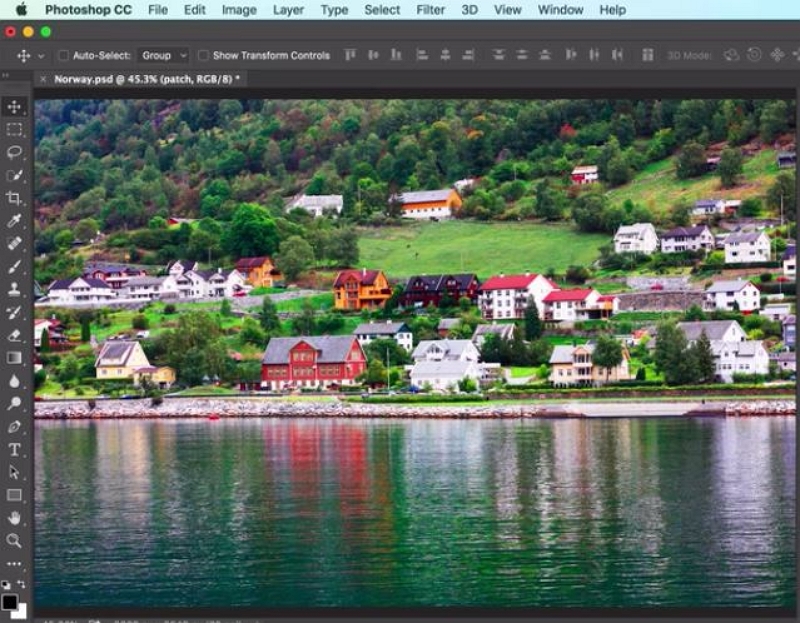
Step 1: Run Photoshop CC on your computer or Mac and browse the picture which you like to edit.

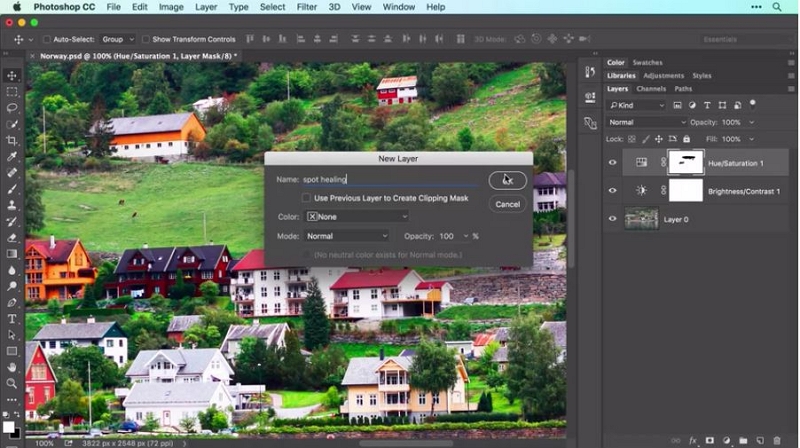
Step 2: Now let’s start editing. For testing we are removing unwanted object from picture. After loading picture first you need to create a new layer so click on “Layer > New Layer”.

Step 3: Now from the right side options activate the Spot Healing Brush and make sure “Content Aware” is activated in front of type. Check the option “Sample All Layers”. You can observe some straight lines are there in the below picture. We will remove these lines in the next step.

Step 4: Now you can remove unwanted things from the picture. Move the cursor on the lines which you want to remove and then it will be removed without blurring the image.

Part 2. Photoshop Express Review
Photoshop Express
URL: https://www.photoshop.com/products/photoshopexpress
Price: Free
Photoshop Express is very professional photo editor software for the mobile and desktop devices with the all basic photo editing features. This program is designed and simplified for the personal users in understanding the interface of program. Unlike the Adobe Photoshop it is easily accessible for everyone. The issue with this software is that you can only edit the photos up to 16 MB of size and in the jpg format.
Key Features
- It is an easy-to-use software compared to the adobe Photoshop.
- Supports iOS, android and windows operating system devices.
- Design of the software is very well and not like the Photoshop app for pc.
- A one touch auto enhance tool is provided in the software which helps you to adjust the white balance, exposure and contrast of the picture with one tap.
- Built-in backgrounds and layouts help you in beautifying photos quickly.
How to Use Photoshop Express
Photoshop Express can be used on Android, IOS and windows devices but here we are going to use mobile version.
Step 1: First install the app from the respective app store of your mobile and run it. You will see multiple options now to browse picture. Simply tap on “All Photos > Camera” to select pictures clicked using your mobile camera.

Step 2: Now let’s crop the picture first. Click the “Crop” tool from interface and adjust the size according to your final picture need. Use the “Free Size” option to adjust the photo size freely without any limitation.

Step 3: After adjusting the image size you have hundreds of tools such as adjust saturation, vibration, clarity, tint, sharpen etc. You apply any tool on your picture and save the final image on your mobile gallery to share with friends and family.

Part 3. Photoshop Mix Review
Photoshop Mix
URL: https://play.google.com/store/apps/details?id=com.adobe.photoshopmix&hl=en
Photoshop Mix is a photography app which helps you in cutting the images in different sizes and combining the different size images in one image for fun. There are some other basic editing features also available in the app which allows you to enhance the photos, change colors of pictures etc. This app can help share the edited photos on social media using the share option or you can also send the photos to Photoshop CC on your desktop for advanced images editing.
Key Features
- Cut, remove any section of the image and merge multiple photos together for sharing with friends.
- You can apply filters, contrast and color on the photos with the app with ease.
- Share your funny edited images on the social media sites with your friends and family directly from the app interface.
- Compatible with the android and iOS devices.
How to Use Photoshop Mix
Step 1: First you need to create adobe id if you don’t have then install the app on your iPhone or Android and run it. Enter the login credentials on the first screen and then at the top right side of screen tap on the “+” and the next screen is file import screen. From this screen choose photos from your device which you like to use as the background.

Step 2: Now choose any background image which you like to use as the image background.

Step 3: After choosing the background image it will open in the layer panel. In the below screenshot you can notice two boxes at the right side, this is the layer panel. You can use up to 5 layers while doing the editing in the app.

Step 4: Now we will add another image on the background. To add image click on the “+” layer icon and select the new image file which you like to use as foreground for this background image. New image will be added on the foreground of background image just like the screenshot below. Like that you can add more elements as well.

Step 5: Set the new layer position as per your need and browse more layers if you want to add more.

Step 6: Now simply use your creativity and make the image design as per your need. Finally save the image and use it where you want. After saving the image it will be available in the My Projects tab of the app.

Part 4. Photoshop Fix Review
Adobe Photoshop Fix
URL: https://www.adobe.com/in/products/fix.html
Price:Free
Adobe Photoshop Fix app is a mobile app developed and maintained by the Adobe officially. This app enables you to quickly fix the photos on the Android and iOS version mobile devices. This app is easy to use as compared to the other products of adobe. Adobe Photoshop fix app also offers you to access the edited images on the desktop by signing in to your adobe account.
Key Features
- It supports retouching the images and gives a perfect look.
- You can sharpen your skin simply by using paint option of the app.
- Adobe fix allows you to select specific part of picture and increase or decrease darkness.
- You can also add saturation, contrast and exposure to the photos with ease.
- This app enables you to send the prepared images to the desktop Photoshop CC for the advanced editing using the syncing option.
How to Use Photoshop Fix
Step 1: Download and install the app on your iPhone or Android then run it. Now browse any picture of your choice which you need to fix.

Step 2: Once you have loaded the picture in the app interface simply tap on the any tool available at the bottom bar of the app. For example let’s adjust the image exposure. Tap on the Exposure option and increase or decrease it according to your need. After editing your image properly you can save it to your iPhone gallery to share with friends.

Part 5. A Easier Desktop Solution for Photoshop Alternative
Wondershare Fotophire Editing Toolkit
URL: https://photo.wondershare.com/photo-editing-toolkit.html
Wondershare Fotophire Editing Toolkit is a newly developed program and truly available from Wondershare officially for enhancing the photos on your computer. This program is available for the windows operating system only. You can edit any part of your picture with the software without using the Photoshop tools. If you are a personal user who don’t know much about editing photos then the Fotophire Editing Toolkit is a one stop solution for all your problems.
- Enables you to apply more than 200 effects to your photos to make them better.
- Crop or cut pictures to the size to meet any of your need.
- Help you to remove any unwanted objects from your photos.
- Allow you to use the Creative Blur to refocus your photos in a click.
Key Features
- Easy to use software interface that can help anyone in editing the photos.
- There are over 200 premade effects available in the software which can be applied on photos with one click only.
- Fotophire Editing Toolkit also allows you remove or replace the images background with new one.
- There are over 20 premade backgrounds available in the program that can be used with your photos.
- Removing any unwanted object from the picture without burring the previous image.
How to use Fotophire Editing Toolkit to edit photos
Fotophire Editing Toolkit has hundreds of options for editing the photos but here we are going to learn about adding frames on photos with the help of this software.
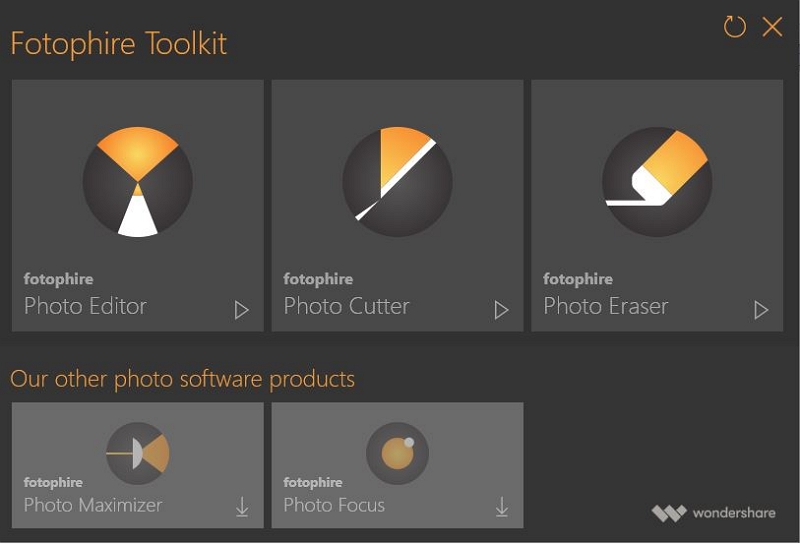
Step 1: First run the program on computer and click the “Photo Editor” option at the main welcome screen. Now drag & drop the picture which you like to edit using this program on the next screen.

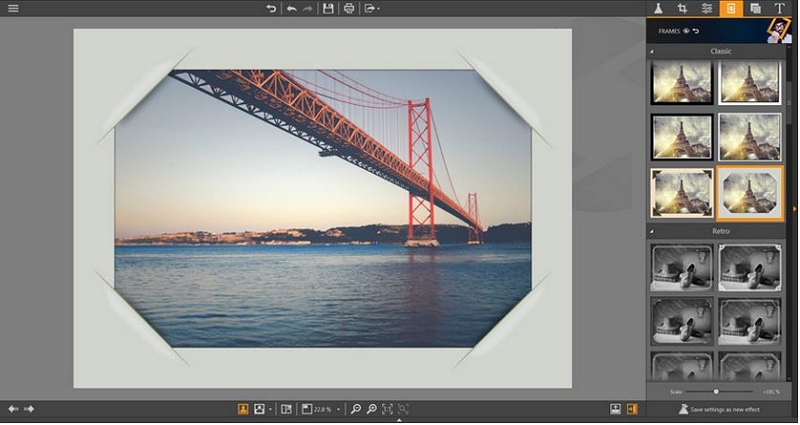
Step 2: Once the picture is loaded in program editor windows click on the “Frames” which is fourth option at the top right side menu bar. Here you will see more than 100 premade frames to use with your photos.

Step 3: Click on any frame and it will be applied instantly on your photo in real time. After applying the frame on your photos, save it in the high quality on your computer. That’s it.

Conclusion:
Professionals always prefer Photoshop as their photo editor program ,but this is really very hard to use by personal users even people face issues in finding the right options. Finally, it is better to use the program that comes with easy interface but with professional options and high quality output. Fotophire Editing Toolkit is the program what you actually need. Due to the easy to use interface, high quality output and easy options this program is now used by thousands of professionals as well.
