Fotophire Editing Toolkit
Your Complete Photo Editing Toolkit
It is not necessary to know everything all the time. Having a zero idea about making background transparent is completely okay. It can be difficult to get aware of these technical and photo editing skills when you belong to some other field and have busy schedules. There are many people like you who don’t know how they can execute this transparency method. If you can relate here and are looking for a way to make background transparent, we are here to help you out. We would gladly like to tell you that there are several useful methods with which you can learn how to make background transparent. This is what we are going to demonstrate in this article. Without much more talk, let’s focus on the different methods.
Before you ponder over what is Wondershare Fotophire Editing Toolkit, let us remove the ambiguousness. Fotophire is a professional and a powerful photo editing software by a well-known brand ‘Wondershare’. This product by Wondershare can work on Windows PC and is considered as one of the skilled software in the market. If you are Windows PC users, this will be sound choice for learning how to make background transparent. The best part is this software doesn’t compromise quality of the picture and provides results in just a few clicks.
Key Features of Wondershare Fotophire
Here are the steps to make background transparent with Wondershare Fotophire.
The process starts when you download Wondershare Fotophire via its official website. Install it post downloading and then launch it. When you come to the first screen of the program, you will notice some panels with different options. You are required to click on ‘Photo Cutter’ one for the transparent background making process.

Now, the next screen will require you to import your photo in which the process needs to be taken. Click on the ‘Open’ option and pick out the image you want. Your picture will begin uploading once you select it.
Please note that you can get a brief information about the process in the ‘Tutorials’ section with the sample photos given.

3.1 The actual process starts here. Choose the ‘Paint Areas to Remove’ tool given at the right side of the interface under the ‘CUT-OUT’ tab. With this tool, begin to mark the background area that needs to get transparent. You can mark rough lines and leave the rest on the software.

3.2 The ‘Paint Areas to Keep’ option is there for correction of the parts that got removed accidentally. Just draw the lines roughly on the parts (if needed) that you don’t want to make transparent.

3.3 Also, you can use the ‘Erase Painting’ tool under the same section in case you have accidentally made the part transparent or kept the part you didn’t want.

When everything gets done and you can see the final output as per your expectation, you can then save the transparent photo background file in your PC. Hit on the save icon that can found on the top of the screen.

In case you want to get the result file printed, you can choose the print icon which is just next to save icon. On choosing this, you can go through the preset printing templates in order to get the settings customized in your way.

Lastly, you can share the file to Facebook too if you wish. For this, look just next to the print icon and you will see a share icon. Click and fulfil your needs.

Note:After you finish making background transparent and add your wanted background to the picture, you could try another new product from Wondershare. It is called Fotophire Slideshow Maker, which could turn your photos into vivid Slideshow with abundant effects, you only need 3 fast steps to finish an amazing slideshow.

The next contender on the list of how to make background transparent is Photoshop. Adobe Photoshop is a renowned tool that is an ideal tool for pro users and is efficient enough to enhance the quality of picture or to make the background transparent of your desired image file. Since, it is an advanced editing tool you must have high editing skills too in order to use this software effectively. No matter, how tough it is to operate Photoshop but with a good amount of practice, it can be fun to use.
Let’s explore the steps on how to make background transparent in Photoshop.
There are multiple tools available in Photoshop using which you can make the background transparent, namely ‘Quick Selection’ tool or ‘Magic Wand’ tool or the ‘Lasso’ tool. In this article we are going to use ‘Quick Selection’ tool to make the background transparent of your desired image file.
Step 1 – First of all, launch the software and import the image file from which you wish to make the background transparent. Now, tap the ‘W’ key on your keyboard or choose the Quick Selection tool from the tool-rack on the left.

Step 2 – Take a close look at your cursor, if you’re able to see a ‘+’ sign in the middle of a small circle that you have successfully equipped the Quick Selection tool. Now, start marking out the area that you wish to remove from the image and make its background transparent. Photoshop will detect the parts that are being selected and will choose the hard-edged and high-contrast parts itself neatly.

Step 3 – Let’s now make your selection more fine-tuned. For this, you are required to minimize the brush size and zoom into your image. In case, you accidentally or unintentionally select the an unwanted area, hold down the ‘Alt’ key on your keyboard and then start dragging your brush over the region which you wish to deselect.

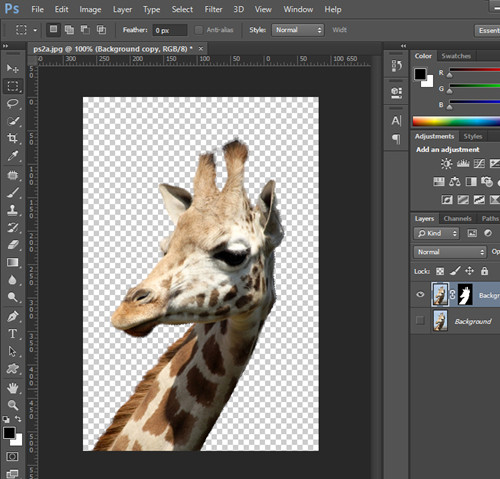
Step 4 – Once you are satisfied with the selection that you wish to remove, you now need to inverse your selection by following key combination on your keyboard: ‘Shift + Control + I’ in order to keep the giraffe in the image and remove the remaining background. Next, hit on ‘Refine Edge’ button available at the top and then hit the drop down icon next to ‘View’ under the ‘View Mode’ section in order to see the selections. Then, click on ‘On Layers’ option from the drop down menu.

Step 5 – Next, in the ‘Refine Edge’ pop up window, select the ‘Smart Radius’ option and set the radius accordingly to make the subject details more smooth and realistic. Post that, look under the ‘Output’ section and select the option ‘Decontaminate Colors’, this will erase extra colour fringes. Also, in ‘Output to’ section, you need to select the ‘New Layer with Layer Mask’ option.

Step 6 – Once done, hit on ‘OK’. You’ll now be navigated to the main image and notice that the background of your image has been removed already and only your new layer (isolated object) is visible on the canvas.
Step 7 – Lastly, you now need to save your isolated object image (transparent background) in a PNG file format. In case you save it to other image formats, please remember, it will turn the transparent background into white background by default. Transparency can only be retained in a PNG file format. Hit ‘Ctrl + S’ button on your keyboard and then give a name to your output file and select the file format as ‘PNG’. Finally, hit on save and then confirm you actions. That’s it, you’re all sorted now.

If you are using a Mac computer, you must be aware about its inbuilt tool ‘Preview’. It is a photo editing software that can be used to make background transparent in your computer. On having a Mac, you should not give a second thought about Preview tool when there is a requirement of making background transparent. This tool is able to support file types including JPG, PNG and PDF. Let us move to its guide now.
Step 1 – First of all, you need to open the preferred photo. For this, go to the picture and click along with Control or simply right click on it. Go to ‘Open With’ option and click ‘Preview’ option. This will open your image with Preview and you can now proceed to the step 2.

Step 2 – To create a transparent photo background in Mac, the ‘Markup toolbar’ is going to help you. For this, click on ‘Show Markup Toolbar’ button. This option is available as a toolbox icon. Subsequently, choose ‘Instant Alpha’ option (kind of a magic wand icon).

Step 3 – After this, click and drag the cursor over the background of the photo and the software will detect the space and mark the selection with a ‘Marching Ants’ line.

Step 4 – As the next step, click on the ‘Delete’ key in your keyboard and this will remove the chosen section from the picture. You maybe now asked to convert your picture into PNG. Confirm it and proceed to repeating the steps of selecting and deleting the background until all the remaining space is cleared.

Step 5 – Once the image is in your desired form, it’s time to save it. Now, press the ‘Command’ Key along with ‘N’ key on your keyboard to bring up a ‘New Clipboard’. Now drag the isolated image from the old clip board to the new clipboard. Once done, save it in your Mac and use it for what purpose you wish.

If you don’t want to use your PC for background transparent process, you can easily do it on your phone also. Also, if you don’t own a PC, there are some apps that can help you do the same. Thanks to Background Changer & Eraser to be in the top list and there to help those who wish to do editing on their tips. This app provides so many features that make it a good choice to work with when one doesn’t have a computer. With this app, the users get crop option, brush size increase/decrease feature, variety of colours to set as a new background, emojis to add in your photo etc. you can rotate and zoom your photo with ease. Also, you can either save the photo in your SD card or share it on social media directly. It also gives you functionalities to sharpen, smoothen, set brightness, and contrast your photo. Let’s know its steps now.
Step 1 – Download the app from the Play Store and install it. Open it post installation and tap on ‘Start’.

Step 2 – Tap on ‘Gallery’ to get into it and bring the picture required to get edited.

Step 3 – Choose one photo and it will appear in the app interface. Crop it according to you and tap ‘Done’.

Step 4 – Choose the ‘Eraser’ option given at the bottom and start highlighting the parts of the background you need to make transparent. You can undo and redo your actions and even set the offset.

Step 5 – When the highlighting gets done, tap on the ‘tick mark’ icon twice and your picture will save automatically in your gallery.
Background Eraser is the one the best iOS apps available to make the background transparent of an image. Being rated with 4+ stars of rating at the Apple Store, the process to make background transparent via this app is quite simple. You can make use of its Target function in order to make the background transparent of an image effectively and efficiently. The app is available for free and the latest update of this app have a lot of major improvements, for instance, you can now remove watermarks or zoom, rotate or move the foreground of a transparent image. If you wish to save the processed image directly to your social accounts (twitter, facebook, instagram or other), you can easily get that done from within the app. Moreover, it enables you to crop out your desired image with the help of 15 presets. The tool is packed with 9 adjustment tools (vignette, shadows, brightness, exposure etc.) that will also aid in enhancing the beauty of your image.
Below mentioned is a step by step procedure to remove the background of an image, please make sure to follow the steps as demonstrated.
Step 1 - Download and install the Background Eraser app from App Store and launch it.
Step 2 - Now, hit on the image icon available on the left top corner and locate your desired image from which you wish to cut out the background.
Step 3 - Next, after your preferred image is loaded on the canvas, tap the Erase button from the tools panel available at the bottom. You can now manually start removing the background of the image.

Step 4 - In order to boost your speed and efficiency, make use of ‘Target Area’ tool at the bottom, it will help you to quickly make the background transparent. When you select the aforementioned tool, you will find a circle with two intersecting lines. The point where the lines meet i.e. the intersection point will help in removing the background. In other words, you simply need to stick the intersection point where you want to make the background transparent.

Step 5 - Once you’re satisfied with the processed image results, hit the ‘done’ button on the right top corner. Now, hit the export button from the next screen which is available at the right top corner again. Subsequently, select the preferred file format (PNG or JPEG) for your processed image. Make sure to choose PNG in this case to keep the transparency of your processed image intact. Or else, it will get replaced by a white background if you opt for the other file format. Also, set the desired image quality by selecting from either ‘Small’, ‘Normal’ and ‘Max’.

Step 6 - All set now, you just need to hit on the green coloured ‘downward pointing arrow’ icon. Confirm your action by tapping the ‘Yes’ on the pop up message confirming the save operation. You will be notified of successful saving of photo and that’s it.

Many occasions occur when there comes a need for making the background transparent from a photo. We have stated some helpful methods that can help you making background transparent. However, using Wondershare Fotophire would turn out to be the most helpful solution for you since it is extremely easy to use and provides a great deal of amazing features. And its modern interface is really appealing. So, have you started making your photo’s background transparent? If not yet, then start doing it now! Thank you for reading. Hope you liked this post and got useful advice.
