Fotophire Editing Toolkit
Your Complete Photo Editing Toolkit
There are a couple of different ways that you can change the background of your photographs. This article will introduce you to different methods that you can use to change the background of images in Photoshop as well as a couple other programs. We’ll be including step-by-step procedures of the first two, and will follow that up with quick breakdowns on the other five. If you want to learn more? Continue reading!
Adobe Photoshop is a piece of complex software. Most people that use it had been trained in order to do so. This training consists of months or years learning all the little tricks, keyboard shortcuts, terminology, etc. In short, Photoshop wasn’t made for just your regular Joe, it’s a premium product that was made specifically for professionals. Still, you can follow these steps if you want to do a quick photo background editing.
The first thing that you have to do, in order to change the background of your images in Photoshop, is to import the file that you want to edit. You can do this by clicking on the “Open…” button on the main menu page.

This next part will require you to apply a ‘transparency’ mask on your image. There are a couple of ways that you can do this:
Doing this will change the look of your Photoshop editor so that you can erase and apply the mask based on your needs.

You can control the parts that you want transparent by erasing parts of the mask. There are a couple of different tools that you can try (highlighted in the image below.) By the end, only the background should be covered by the mask. When you’re done, click the “OK” on the bottom right-hand side of the screen to be moved back to the original editor.

Once you’re done picking out the parts that you want to keep, you’re going to have to apply the Layer Mask. Do this by right-clicking on the original layer. This will open a drop-down menu with a couple of different choices. All you have to do next is press “Apply Layer Mask.”

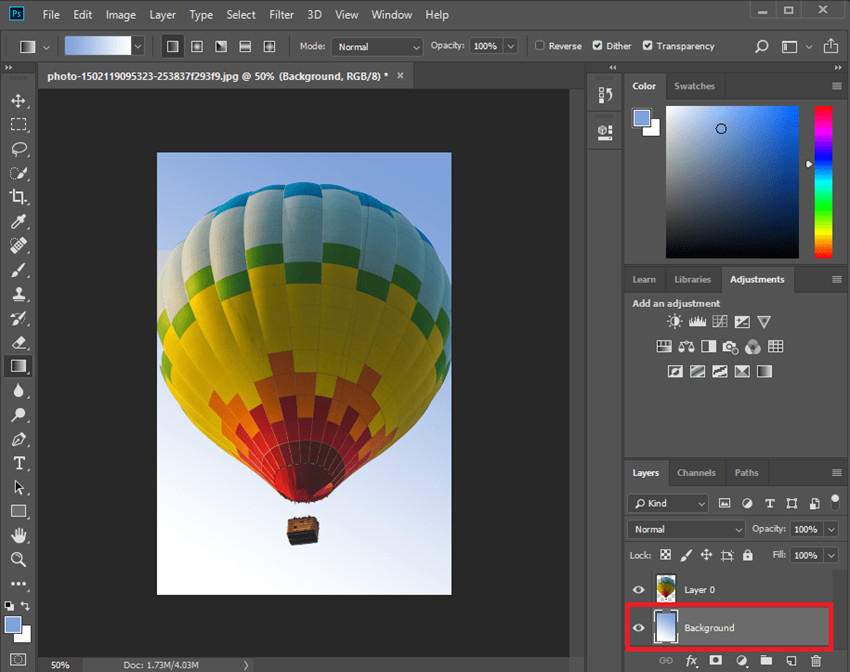
You can change the background of your images in a couple of different ways. But first, you’re going to have to “Create a New Layer” so that the new background can be applied under the original image. As for changing the actual background, you can try one of the following methods:
Tip: Whatever kind of background you want to apply, make sure that it’s below the original layer (as highlighted in the image below.)
The most important part is saving your final product. With Photoshop you can go about this a couple of different ways.

This is an online background changer for PC users, especially for beginners who do not equip with any professional graphic design skills. You are allowed to easily drag or drop every single element to make your design much more stunning.
Step 1: Go to the official home page of the PixStudio and click on “Start Design Now”.

Step 2: Choose the target design you would like to have. After you’ve uploaded the image, try to click “Remove Now” to remove the background.

Step 3: Click to “Background” on the left and you can change the background color or massive exquisite background at your will. Also, you can add the effect that you favorite.

Step 4: You can download the photo for free and get the resulting image.

Now that you’ve been introduced to changing backgrounds in Photoshop, let’s look at an easier way. This method will be demonstrated using the Fotophire Editing Toolkit. It’s an intuitive set of graphics editors that offer premium tools and an easy-to-understand interface at a low cost!
Here are just a couple of its relevant features:
First of all, you’re going to have to download and install the software. The Full version can only be unlocked if you purchase the Fotophire Editing Toolkit. However, you can try out some of its features by downloading the FREE trial.

The product might take a couple of minutes to install. However, once you’re done, you can finally launch the “Photo Cutter” editor. This is the part of the editing toolkit that will allow you to remove and replace the background of your images.

Import the image that you want to edit into the Photo Cutter by clicking on the “Open…” text on the main menu screen. This will prompt a Windows/Mac pop up that will ask you to locate the image file of your choosing.

The Fotophire Editing Toolkit will allow you to easily remove the background of your images. This can be done using the “CUT-OUT” module. It offers a couple of tools that will help you cut the unwanted background and isolate the foreground of the photograph.
Other tools that can be found under the “CUT-OUT” module are:

There are a couple of different ways that you can change the background of your photos with the Photo Cutter. For example:
Tip: You can adjust the cropped image as much as you wish to make it match the new background— move it around, resize it, rotate, etc.

Once you are satisfied with your work, remember to save! You can do this by clicking on the “Save” icon on the top menu-bar (highlighted in the image below.)

If you’re still not convinced, consider the next 5 programs down below. All of these will allow you to change the background of your photographs. Some of them are made specifically for background photo editing, and others will offer you a variety of other premium editing tools. We’ll be breaking down the price, pros, cons, etc. of each product so that you can see which is the right one for you.
Price: $19.99
The first one that we’re going to be talking about is the Teorex PhotoScissors. This program falls under the ‘made specifically for background photo editing’ - role. However, it can be purchased in a bundle with other Teorex photo editing tools for around $119.99. Of course, if you’re looking to purchase only the PhotoScissors, that will be much cheaper — costing $19.99 for the full license.

Price: FREE
GIMP is used by a lot of novice artists because it is 100% free and made to accommodate people who are new to graphics editing. It’s better known for its illustrator tools, however, you can still use it to easily remove and change the background of your images.

Price: $39.27
We didn’t forget all the Mac users out there! If you’re looking for a background photo editor for a computer that’s running Mac OS (Operating System) then you can try out the Acorn 6 Image Editor. This is a standard photo editor that allows for the removal and the changing of your background.

Price: Personal License ($39.95); Business License ($79.95)
This next background photo editor is called Movavi. It can be purchased on its own, or with the other editors that they offer. The Movavi, in itself, offers a set of editors. One of which can help you remove and customize the backgrounds of your image.

Price: $14.99
Our last recommendation is another shout out to Mac photo editors. This one is called the super Photocut and it costs around $14.99 for the full license. It’s made specifically for background photo editing, so there’s not much else to it. Still, it’s pretty easy-to-use.

Looking for a good photo editor is tough! However, there’s enough of them out there that you can pretty much pick and choose the one that works for you. Of course, that takes some trial and error, but if you want a recommendation? Check out the Fotophire Editing Toolkit first. It’s a lot easier to use than Adobe Photoshop. Which makes changing the background of your photographs simple and quick – making Fotophire the most helpful of them all.