All Ways to Fix Grainy or Fuzzy Photos
Taking a photograph with an older camera can produce grainy or fuzzy photos. This can also be achieved when the camera is moved whilst the photograph is being captured. Either way, there are many ways that you can fix grainy or fuzzy photos nowadays. You can do so on the PC, online, or even on your mobile phone! Continue reading to find out how to fix grainy or fuzzy photos easily.
- Part 1. Easiest Way to Fix Grainy or Fuzzy Photos
- Part 2. Another Desktop Way to Fix Grainy or Fuzzy Pictures
- Part 3. Online Way to Fix Grainy or Fuzzy Pictures
- Part 4. Mobile Way to Fix Grainy or Fuzzy Pictures
Part 1. Easiest Way to Fix Grainy or Fuzzy Photos
The first method that we’re going to introduce is not only the easiest way to fix grainy photos, but also one of the best graphics editors in general! The product that we’re talking about is called Fotophire Focus. This graphics editor is available for download on both Windows and Mac operating systems, and features a variety of different tools that can help you fix fuzzy images. For example:
Key Features of Fotophire Editing Toolkit
- One-Click Sharpen: Fix grainy pictures with one-click!
- Sharpness Sliders: Adjust the enhancement with sliders.
- Before & After: See the before and after versions of the images that you want to fix.
- Drag & Drop: Intuitive and easy-to-use drag and drop interface
- Adjustments: Make adjustments using other special tools.
How to Fix Grainy or Fuzzy Photos with Fotophire Focus
Step 1: Launch Fotophire Focus
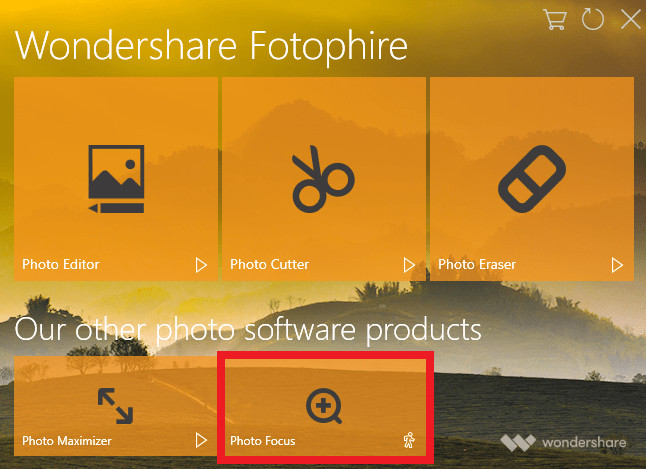
Let’s begin! First, we’re going to have to download the demo-version of Fotophire Focus. This can be done through the Wondershare official website. You can also purchase the program via a one-time payment for the full license. Either way, the download and installation process should only take a couple of minutes. When it’s done, launch the “Photo Focus” editor.
Step 2: Import Image
In order to begin, we’re going to have to import the fuzzy photo that we want to fix. To do that click “Open…” on the main hub. Once the image has been imported, we will be moved to the main editor.

Step 3: Sharpen Image
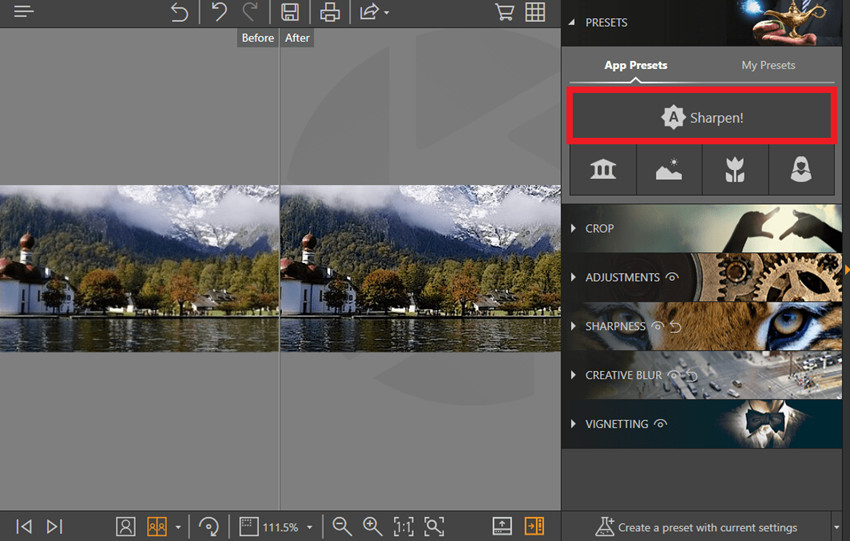
It’s actually very easy to fix grainy photos with the Fotophire focus. All you have to do is click the “Sharpen!” tool under the PRESETS menu. This will automatically fix fuzzy photos for you (as shown in the image below.)
Step 4: Sharpness
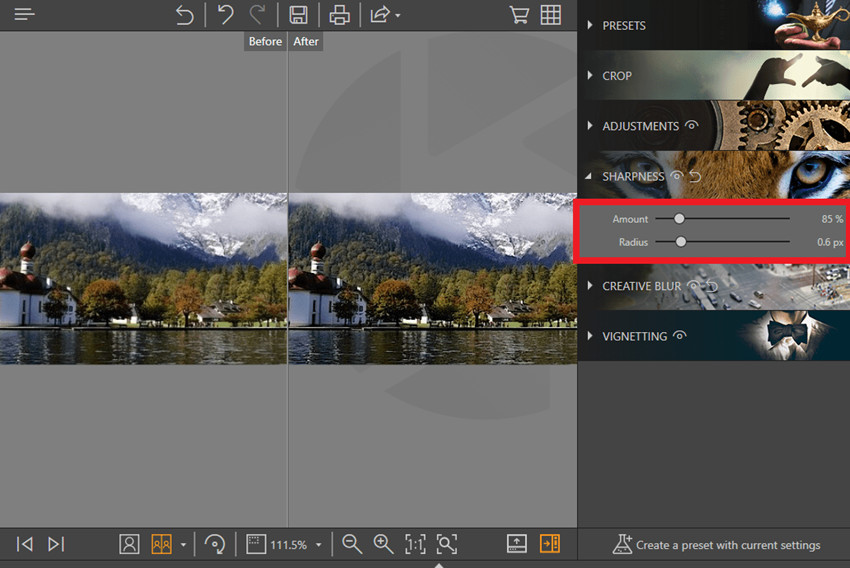
However, we’re going to take the process a step further by adjusting the level of enhancement. This can be done using the sliders below the SHARPNESS menu.
- The Amount slider is for controlling the overall sharpness of the image.
- As for the Radius slider, this is for adjusting the textures of the pixels — making them either sharper or smoother.
Step 5: Adjustment
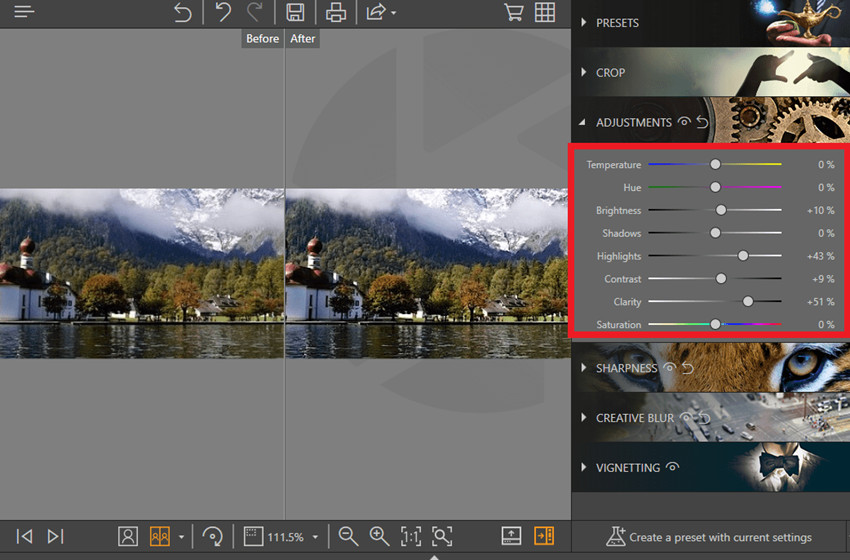
As an extra tip, you can also adjust the overall look of the image using the sliders under the ADJUSTMENT menu. Just play around with options like Sharpness, Contrast, and Clarity until you get the look that you want.
Step 6: Save and Go
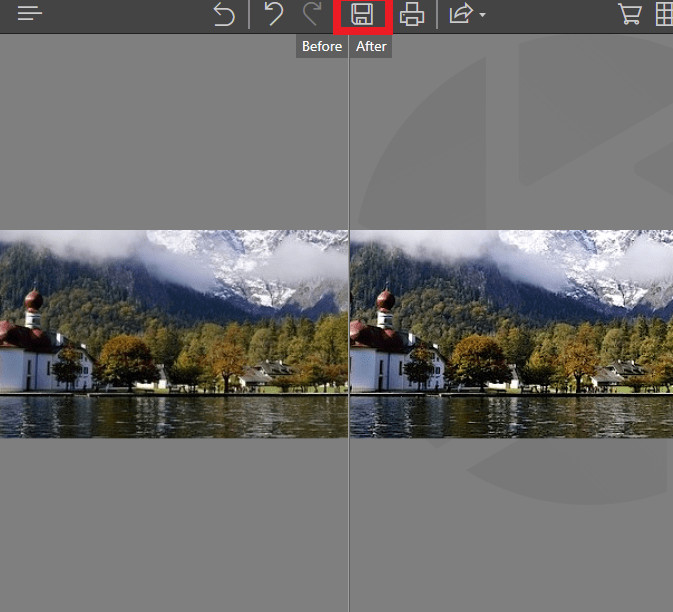
All you have to do next is save the finished image. You can do so by clicking the Save icon that is highlighted in the image below.
Part 2. Another Desktop Way to Fix Grainy or Fuzzy Pictures
Another way of fixing grainy pictures on the desktop is through Adobe Photoshop CC. This is a professional graphics editor that offers a lot of features, but it is not necessarily the easiest way to do anything. In fact, Photoshop’s level of complexity often requires a long training period. Nevertheless, we’re going to demo the product here.
How to Fix Grainy or Fuzzy Photos with Photoshop
Step 1: Launch Adobe Photoshop CC
You’re going to have invest a couple of hours to download and install Adobe Shop CC, I suggest doing so over night. The program can be downloaded on Adobe official website, and launched through the automatically setup Desktop shortcut.

Step 2: Import Image
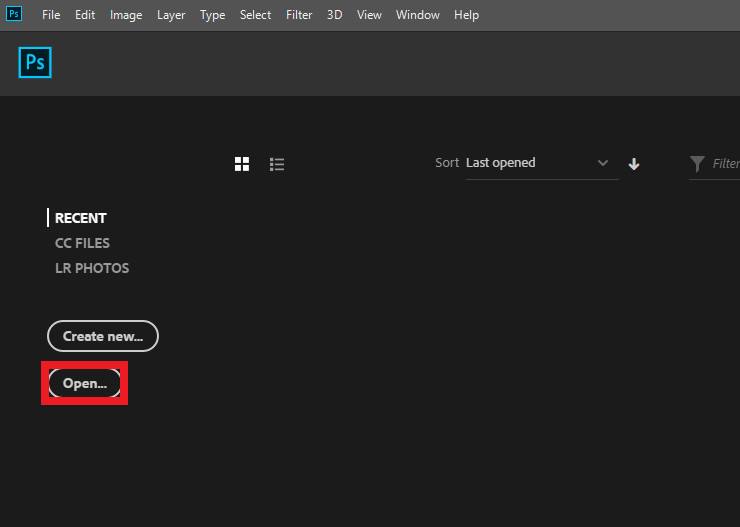
In order to begin the actual editing process, you’re going to have to import the image first. Just click the “Open…” button on the main hub, and pick the fuzzy photo that you want to fix.
Step 3.1: Shake Reduction
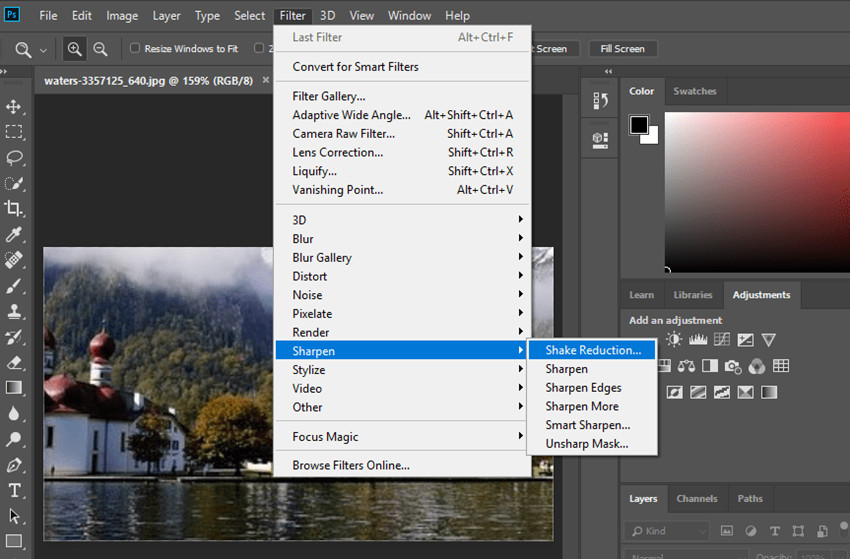
In order to fix grainy photos with Photoshop, you’re going to have to apply a filter that will sharpen the image. You can find this filter on the Filter tab in the top menu. Next, click Sharpen > Shake Reduction.
Step 3.2: Shake Reduction
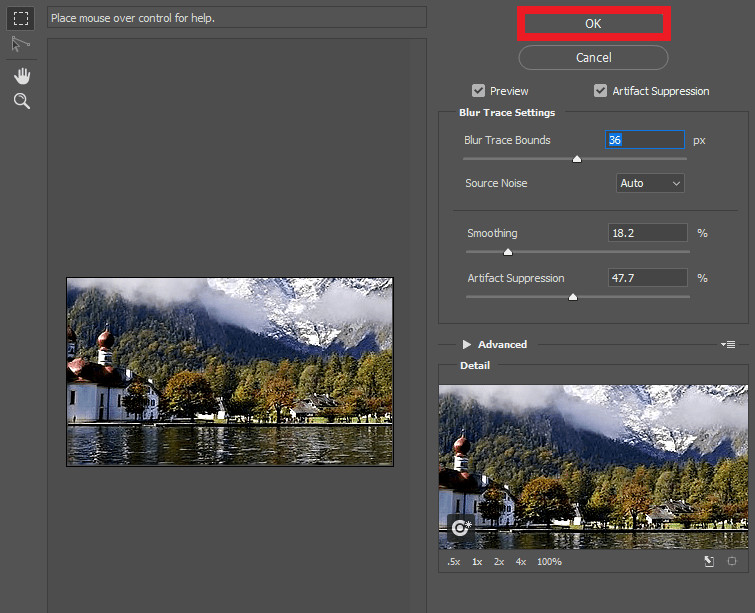
The image should have been fixed immediately, but you can finalize the edit by clicking the OK button on the top right-hand side. The tab that opened will also offer a couple of sliders that you can use to adjust the sharpened quality of the image.
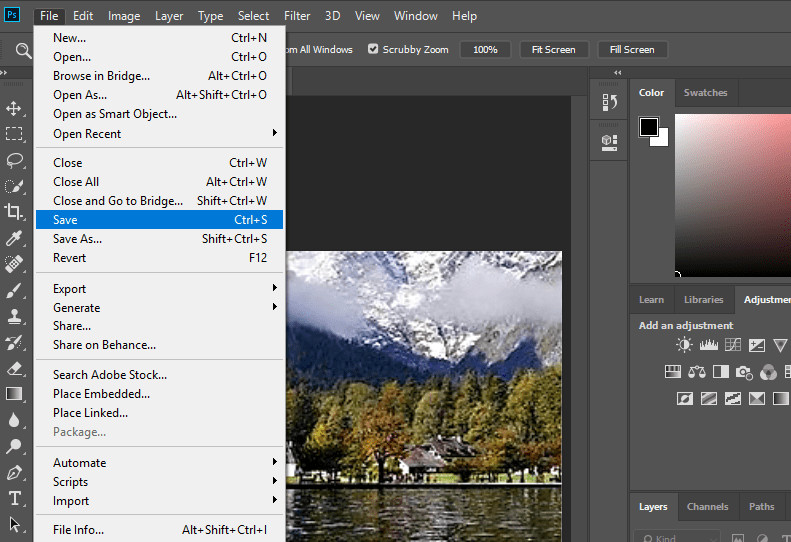
Step 5: Save and Go
Save the image by pressing Ctrl + S on your keyboard, or locating the Save option under the File tab.
Part 3. Online Way to Fix Grainy or Fuzzy Pictures
The demand of photo editing tool is rapidly increasing with the fast rate. On the web, you will find a wide range of online websites that offer online photo editing service but it is not an easy task to choose best as per your needs without consulting any professional. If you are seeking for blur remover online websites then, your search is finally over now. We find Wondershare PixStudio online website is best for you that give you best solution to your problem remove blur from photo online. Wondershare PixStudio is a sophisticated online photos editing tool that is powered by abundant online functions that enable the user to easily edit any photo and give it a professional look. If you have questioned how to remove blur from a photo online, then this tool is best for you. Wondershare PixStudio has the ability to remove blur from an image within few seconds. Engaging with Wondershare PixStudio online photo editing tool, you will find photo editor, effects, Photo collage, Graphic design, HDR, stickers, and many other features that enable you for photo retouching.
How to Fix Out-of-Focus Photos Online
Step 1: Go to the PixStudio website and choose the target design.

Step 2: Upload your blurry picture that you want to make it clear.

Step 3: Select the picture, choose “Attribute” and you can see “Blur”.
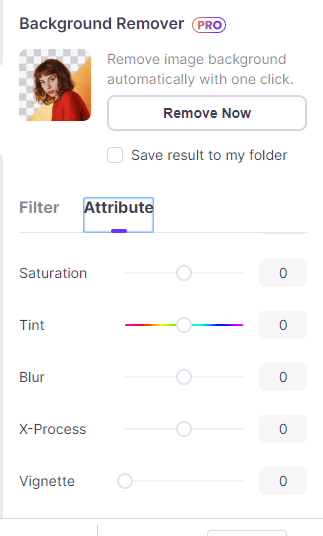
Step 4: Drag the “Blur” buttom to the left, and you will find your picture become much more clear.

Step 5: After fixing your picture, you also can try to edit your photo, if you tried not to edit your image, you can download your resulting image for free.

Part 4. Mobile Way to Fix Grainy or Fuzzy Pictures
Our fourth and last method is through mobile devices. The app that we’re going to be demonstrating with is the Adobe Photoshop Express. It’s available in both Android and IOS devices, and functions almost like a mini version of the regular Adobe Photoshop CC.
How to Fix BLurry Photos on Mobile
Step 1: Launch Adobe Photoshop Express
You can download the app on your device by clicking here, or looking it up on your Google app or Play Store. Either way, it shouldn’t take you too long to get started on the editing process.

Step 2: Fix Grainy Photos with Mobile
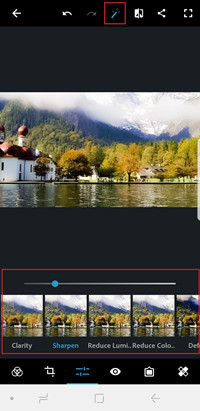
There are several ways that you can fix grainy photos with the Adobe Photoshop app. You can click the magic wand tool at the top menu bar, or make a couple of detailed adjustments using the sliders in the bottom part of the screen.
Conclusion:
Although we had shared a variety of different methods that you can use to fix grainy or fuzzy photos, there is no denying that the Fotophire Focus is the best one! With a small one-time payment you will have access to the full-licensed version that will offer all the different editing capabilities of the other programs that we introduced. Not only that, but the Fotophire Focus is much more intuitive and comprehensive, making it the easiest program to master.

