Fotophire Editing Toolkit
Your Complete Photo Editing Toolkit
It can be a little tricky to get the crisp image that you want. Occasionally things don’t go the way you want them to. Even just a little bit of a nudge can make the image go completely out of focus. Our How to Fix Out-of-Focus Pictures with all Methods article will be demonstrating a couple of different ways that you can use to sharpen up your image. Give it a scroll! We’re going to be showing you how to fix out of focus pictures through programs like photoshop, lightroom, fotophire focus, etc. Hopefully, by the end, you’ll know which program is the one for you.

The first product that we’re going to be introducing, is actually one that you have probably heard about before. Adobe Photoshop CC is the graphics editor. A majority of professionals use this program to edit their photographs. The only drawbacks on the product is the complexity of the interface and the expensive monthly or yearly premium memberships — which can lead to a very empty bank account.
The demo starts by downloading the program. You can do so by accessing it through their official website. The installation process does take a couple of hours. You will need to wait for the bulky software to download and sign up for a Creative Cloud account. The best time to do this is overnight. Once the program has been downloaded and installed, just open up Adobe Photoshop CC through the Desktop Shortcut.

Next, you’re going to import the image. In order to do this, you’re going to have to click the “Open…” button on the main hub. This will prompt a windows popup where you can locate the out of focus picture that you want to fix.

Now, we can begin the editing process. In order to fix out of focus pictures with Photoshop, you’re going to have to use a filter. Start the process by clicking on the “Filter” tab. Locate the following in the drop-down menu to open the blur editor: Sharpen > Shake Reduction...

The main editor will look like this (refer to the image below.) You can change a couple of things using the Blur Trace Bounds slider, the Source Noise option, Smoothing slider, and the Artifact Suppression slider. When you’re done, you can continue on to the next step.

Once you’re satisfied with the way your image looks, all you have to do is save! Click the “File” tab on the top menu and locate the “Save…” option. Extra: If you want to save as you edit, you can use the short-key Ctrl + S.

Adobe Photoshop Lightroom is a more intuitive version of the Photoshop CC. It has a lot of the same features, but it presents it in a way that is far more comprehensible.
In order to begin the process, we’re going to have to download Lightroom. This can be done through their official website. The installation does come at a price. You’re going to have to pay a monthly payment in order to use the Lightroom CC. You’re also going to have to sign up for an Creative Cloud account — this process may take a couple of hours and is best done overnight.

To begin the process, you’re going to have to import the image and locate it in what they call the “Develop” module Once you’ve located your image, we can begin editing.

Our first step in fixing out of focus photos with lightroom involves precision sharpening. You can find the tools to do this under the Details drop-down menu on the right-hand side of the screen. There is a sharpening tool under this drop-down menu with a slider called the Amount slider.

There are two other sharpening sliders under the Amount slider. These are:

Now that we’ve done a thorough demonstration of how to fix out of focus pictures with both the photoshop and lightroom, we can compare the two programs. Let’s do a quick break down of each.
We’re going to be starting with the Adobe Photoshop CC. As mentioned previously, this program is the best known graphics editor out there. It’s used by professional photographers and illustrators alike. However, there are downsides to the overall function of the software. For example:

The image shown above is the result of our test-run. As you can see, the image was in fact sharpened to a degree. However, because the program is so difficult to use, it’s hard to get the crips image that we were looking for. It ended up being a bit muddy and over-enhanced.
The Adobe Lightroom CC is definitely a lot more intuitive than the regular Photoshop. As such, it would be much easier for a beginner to use and master this program. However, we are still looking at a couple of flaws. Like their shared flaw, which is — in order to use the program, you’re going to have to pay a monthly fee of $9.99.

This is the result of our How to Fix Out of Focus Pictures with Lightroom demo. As you can see, the photo was enhanced to produce a better quality image.
It was much easier to fix out of focus pictures with Lightroom. As such, the quality ended up being a lot better — even though the amount spent playing around with the features had been the same for both programs. You can see the difference yourself with the before and after shots from each image.
Both the Photoshop and the Lightroom produced stellar results, but there were a couple of things about the programs that could have been amended. That is why we’re going to be introducing you to a better way to fix out of focus photos on desktop. In order to this, we’re going to demo a product called Fotophire Focus. Here are just a couple of things that this intuitive graphics editor can do.
First, download the demo-version or purchase the Fotophire focus through the Wondershare Official Website. Unlike Photoshop CC and Lightroom, the Fotophire Focus only requires a one-time payment for the full license. That means, that you won’t have to sign up for a monthly or yearly premium membership.

Import the out of focus image that you want to fix. To do this, click the “Open…” button on the main hub and locate the picture on the windows popup.

You can start it off with the one-click sharpen. It really is as easy as it sounds. You just have to click the “Sharpen!” module below the PRESETS drop-down menu. As you can see below, it automatically fixes out of focus pictures.

The next part involves sharpness sliders — which can be found under the SHARPNESS module. There are two that you can adjust:

If you’re still not happy with the overall look of the image, you can make a couple of adjustments through the ADJUSTMENTS module. A couple of things that you can adjust are: Temperature, Hue, Brightness, Shadows, Highlights, Contrast, Clarity, and Saturation.

Don’t forget to save when you’re done! All you have to do is click on the Save icon on the top of the screen.
Tip: With the Fotophire focus, you can see the Before and After shots of the picture that you want to fix (as shown below).

The demand of photo editing tool is rapidly increasing with the fast rate. On the web, you will find a wide range of online websites that offer online photo editing service but it is not an easy task to choose best as per your needs without consulting any professional. If you are seeking for blur remover online websites then, your search is finally over now. We find Wondershare PixStudio online website is best for you that give you best solution to your problem remove blur from photo online. Wondershare PixStudio is a sophisticated online photos editing tool that is powered by abundant online functions that enable the user to easily edit any photo and give it a professional look. If you have questioned how to remove blur from a photo online, then this tool is best for you. Wondershare PixStudio has the ability to remove blur from an image within few seconds. Engaging with Wondershare PixStudio online photo editing tool, you will find photo editor, effects, Photo collage, Graphic design, HDR, stickers, and many other features that enable you for photo retouching.
Step 1: Go to the PixStudio website and choose the target design.

Step 2: Upload your blurry picture that you want to make it clear.

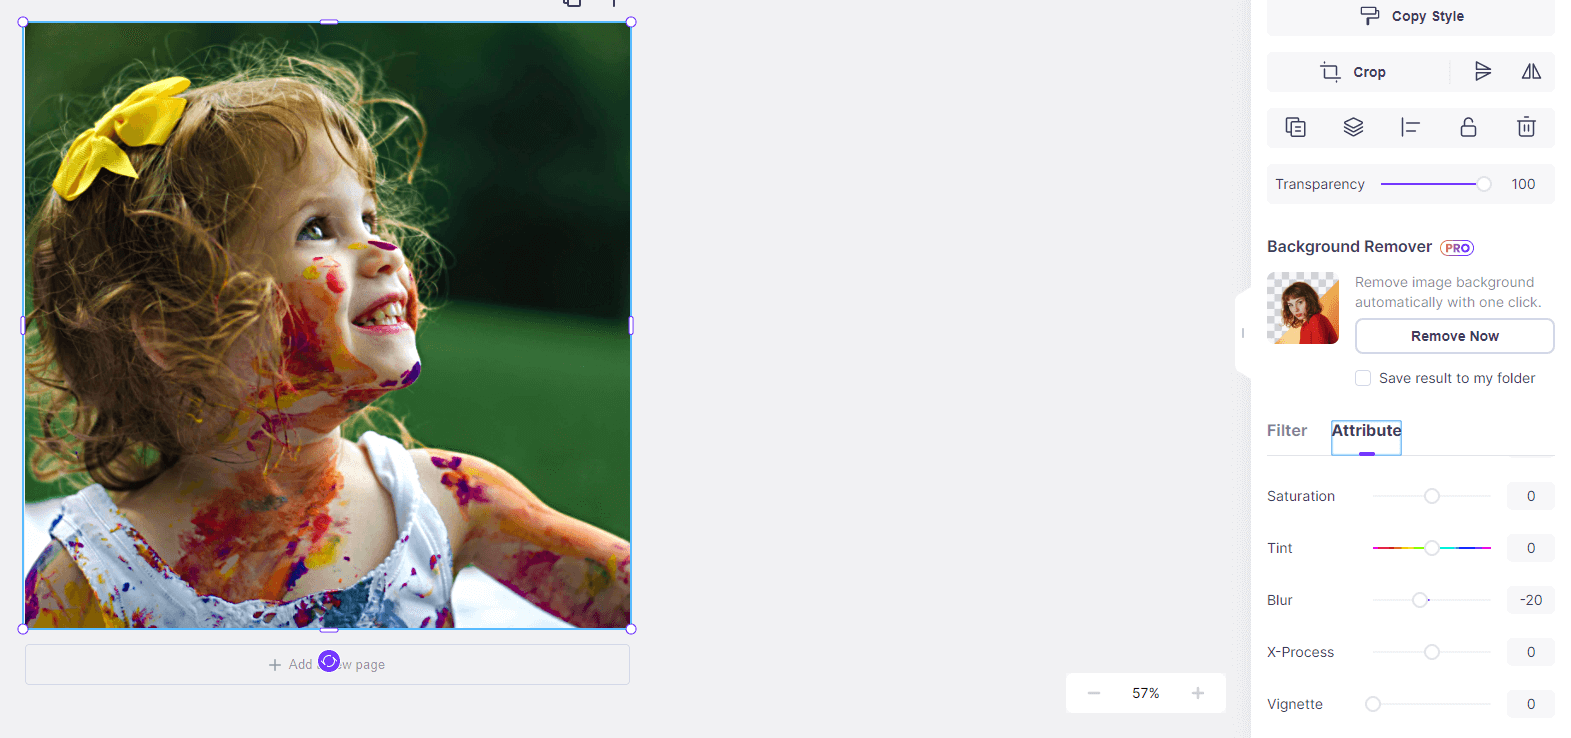
Step 3: Select the picture, choose “Attribute” and you can see “Blur”.
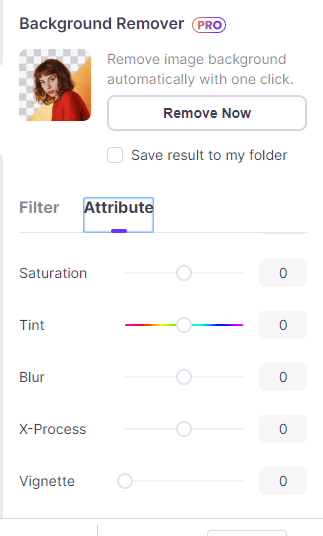
Step 4: Drag the “Blur” buttom to the left, and you will find your picture become much more clear.
Step 5: After fixing your picture, you also can try to edit your photo, if you tried not to edit your image, you can download your resulting image for free.

We introduced a variety of methods to fix out-of-focus pictures today. However, we still believe that there could only be one true winner. In our opinion, the most helpful way to fix out-of-focus photos has to be the Fotophire Focus. It’s intuitive and easy to learn, but even better — it won’t hurt your bank account over the years. You’ll need only to pay a one-time payment for the full license. Doing this will get you all of its wonderful features, without any extra cost to you.